[I was sent this short video and found it quite fascinating. A ‘mash up’ if you will of the Brooklands Racing Circuit as it was back in the day, with the changes imposed by the modern world. Not exactly sure when this was made but it is very clever. Enjoy Mark]
[Folks, in my research to figure out my current conundrum, I found this video. I like it as it isn’t didn’t hurt my head and it uses some pretty good graphics and pictures. I like pictures! I thought others might find it useful as well. Mark]
[Folks, the Bill Fink Celebration of Life was posted on YouTube a few days ago. Simply click on the link below to watch it. Be advised, it is well over an hour long.
As many of you will remember, Bill was our honored guest at the MOGSouth 40th Anniversary Meet in Aiken, SC a few years ago. Should you want to advance the video to about the 31 minute and 20 second point, you will see and hear Tcherek’s comments. Also, at the 1 hour, 12 minute and 30 second spot, there is a clip of Bill in his shop with a two toned (cream body with burgundy wings) 4/4 in the background. I believe this was originally my 1981 4/4 before I picked it up. At least this is what Tcherek told me. Mark]
[I can’t vouch for the accuracy or completeness of this article as I haven’t as yet had to muck with my Plus 4’s SUs. I have done business with Burlen and have found them acceptable as a vendor. I have also done business with Joe Curto and I am a fan. Cheers, Mark]
No matter what the name on the valve cover, so many British classics rely on the ubiquitous SU carburetor: Jaguar, Triumph, MG, Rover, Rolls-Royce, Bentley, Morris, Austin, Sunbeam and so many more. And not only did almost every British manufacturer specify SU carburetors, but so did other companies.
Volvo and Saab also used them, while Hitachi-built versions of the SU were used by Datsun.
Sure, Webers may be sexier and have more racing titles to their credit, but for normal use these SU carbs work well. While some people are quick to cast SUs aside and look for an upgrade, a little understanding and mild tuning can go a long way, whether the goal be increased performance, better drivability, or improved fuel economy.
How They Work
Based upon a principle developed and patented by George Skinner in 1905, the SU (as in Skinners Union) carburetor changed very little until emissions regulations pretty much made them obsolete about 30 years ago.
The SU is about as simple as a carb can get: it has very few moving parts, usually only one fuel circuit, and far fewer springs, balls and other complicated pieces than conventional carburetors.
All carburetors make use of the venturi principle. Daniel Bernoulli, an 18th-century Swiss scientist, used a venturi, a tube that is narrower in the middle than it is at either end, to discover that as the velocity of a fluid increases, its pressure decreases. As the air and fuel pass through the venturi’s narrowed passageway in a carburetor, the mixture speeds up; the resultant drop in pressure is what causes the fuel to atomize.
The SU employs this principle differently because it varies the size of the venturi. Hence, the SU is called a variable venturi carburetor and is grouped with those built by Stromberg, Predator and Amal. In the center of the venturi is a piston with a tapered needle affixed to its bottom side. The piston has holes positioned in it so that as air is sucked through the venturi, vacuum above the piston makes it rise. When it rises, not only does more air flow to the engine, but the needle allows more fuel to flow from the jet below. The needle is a precision piece, with nine to 16 specific diameters measured during the manufacturing process to ensure proper fuel flow throughout the range of air flow to the carb.
Thus, the SU self-adjusts to the air/fuel requirements of an engine. It only flows as much air as necessary, and the tapered needle ensures that a proper fuel mixture is obtained at any air flow. This self adjustment needs a little help at two times: During cold starting and hard acceleration, when a richer-than-normal air/fuel mixture is needed. SUs handle these two situations differently, but again use very simple means. Cold starting any engine requires more fuel in the mixture. With conventional carburetors, this is done by limiting air intake, or choking the mixture. SU carburetors do the opposite, increasing fuel flow to richen the air/fuel mixture without limiting air flow. Most SUs do this by lowering the jet, which allows more fuel to flow thanks to the needle’s taper.
Conventional carburetors use an accelerator pump to squirt more fuel into the mixture on hard acceleration. Again, SUs take a different tack. The piston/needle assembly is damped via a plunger in an oil-filled tube, forming a sort of shock absorber for the carburetor. The damper slows and smoothes the movement of the piston. On hard acceleration, vacuum that would otherwise quickly lift the piston is redirected to quickly suck more fuel out of the jet. As the piston slowly continues its rise, the mixture returns to a more normal ratio.
Basic Tuning
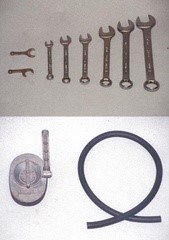
A set of British wrenches and SU jet wrenches (top) are useful tools when working with SU carburetors. These are available from most British car suppliers for relatively low cost.
Assuming that the carburetors are in good condition and have properly sized needles in them, the tuning procedure is not as complex as most people think. However, before the carbs are touched, ignition dwell and timing must first be correct. It’s a good idea to ensure valve clearances are correct as well. A quick check for vacuum leaks is next, and only once this is done is it time to move on to the carburetors.
Next, if there are two or more carburetors, they need to be synchronized. This can be done with either a dedicated synchronization tool or a short length of hose. With the engine running at idle–usually 600 to 1000 rpm–the synchronization tool is placed over the inlet of each carburetor to get a reading on its gauge. The idle screw is adjusted on each carburetor until each one gives the same reading on the synchronization tool. The low-buck method is to substitute a 12- to 18-inch length of 1/4-inch or 5/16-inch hose for the tool. Hold one end of the hose up to the air inlet of each carb and the other end to your ear. When each carb emits the same noise through the hose, they are synchronized at idle. (Note that revving the engine slightly and periodically throughout the adjustment process helps to “clear out” the carbs.)
After the carbs are synchronized at idle, the throttle linkages can then be adjusted to ensure they remain synchronized throughout the rpm range. With just a little free play in the linkage, each throttle arm should start moving at the same time when the accelerator pedal is depressed. If not, the locking nuts can be loosened to adjust the linkage. The idle mixture is set next. The conventional method, which is published in most manuals, works very well. First, each piston is lifted slightly, about 1/16-inch (usually a small screwdriver is helpful for this step). If the engine speed falls off, the mixture is too lean and the jet is lowered via its adjustment nut or screw. If the rpm rise, the mixture is too rich and the jet is raised. If raising the carb’s piston causes the engine speed to rise by about 50 rpm before returning to its previous level, the mixture is just right.
An alternate method is to use a vacuum gauge and adjust the mixture in each carb to get the highest vacuum at idle that is possible. At this point, the idle speed can be verified to be correct and the tuning is nearly done. All that is left is the “choke” adjustment. As discussed before, SUs don’t really have chokes, as they richen the mixture instead to allow smooth engine starting. This is usually accomplished through a linkage and cam that lowers the jets and raises the idle speed. The linkage and cam only affect idle speed in the first two-thirds of the distance of choke cable travel; it increases the air/fuel mixture as well as the idle speed during the final third of travel.
The two steps to adjustment are to ensure that multiple carb setups have proper linkage balance between carbs, then to set the high-speed idle screws that touch the cams. High speed idle is usually around 1800 rpm.
Rebuilding Old Carburetors
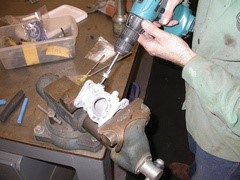
Replacing the throttle shaft bushings requires reaming out the old bushings, installing new bushings, and reaming the new bushings to size.
If you look at the sidebar on common problems, you’ll see that most problems related to SU carbs are due to wear or age. SU carbs are pretty easy to rebuild as there are relatively few parts. Additionally, there are many competent rebuilders who can bring these carbs back to as-new condition for a reasonable fee–figure $50 to $75 to rebush each carb’s throttle shaft and $350 to $500 to completely rebuild a pair. Polishing all of the external parts can add another $100 to $200 to the rebuild cost. Except for throttle shaft bushing replacement, most enthusiasts can carry out repairs at home. Throttle shaft and bushing condition are paramount to tuning an SU, and there are three common solutions for fixing worn parts. One is to replace only the shafts. If the old shafts aren’t too worn, the bushings probably aren’t too worn, and new shafts will go a long way to stopping vacuum leaks. The second repair is to ream out the bushings 0.010-inch and install oversized shafts. This is a cost-effective solution, but can only be carried out once. The third method is to completely remove existing bushings and install new ones, then replace the shafts with standard ones. As can be expected, there are increasing requirements in terms of the cost, skill and tools necessary for each of the respective steps.
Many rebuilders will replace these components and let you do the rest of the rebuild. The rest of the rebuild entails replacing the jets and needles in the carb bodies and piston assemblies, the needle and seat in the float bowls (and floats if defective), and replacing gaskets and rubber pieces. For the car-show crowd, all cast parts should be glass-beaded. It is then usually a good idea to get the linkages and hardware replated in zinc, and to polish the dashpots (the chambers for the pistons).
If you’re a strict concours type, these were not plated or polished from the factory, but it seems most restored cars get them prettied-up anyway. Don’t want to fuss with old carbs? Brand-new SU carburetors are still available. Depending on the application and vendor, figure a brand-new pair starts at about $550.
Performance Modifications
Comparison of earlier- and later-style throttle disks shows that the later-style disks have a spring-loaded poppet valve, which impedes air flow. Replace these with earlier-style disks in performance.
There are not too many performance modifications necessary or possible for SUs. Aside from changing to larger carbs, about all that can be done is to change to needles with a different taper and make modifications to increase air flow around the throttle disk and shaft. Most SU specialists carry a range of needles for changing the mixture characteristics throughout the range of air flow. While the fine-tuning of needles can be an onerous process, there are generally just a few categories of standard needles available. Labeled weak, standard and rich, they provide the levels of performance and economy their names imply. While there are more than 800 needle profiles available, many tuners will just make up their own profile by chucking the needles into a drill press and then using fine sandpaper to sand in the profile they like. Of course, they spend a fair amount of time with a micrometer to ensure they’ve narrowed the needle (richened it) the right amount.
Filters and velocity stacks can make a difference in performance. Usually, K&N filters are worth one or two horsepower. TWM’s velocity stacks can also offer a couple of horsepower, but usually cannot be effectively run with an air filter. Finally, small improvements can be made to the carbs by improving air flow around the throttle shafts and disks. Carbs built after about 1968 feature throttle disks with a spring-loaded poppet valve that improves emissions, but the valve also impedes air flow. Fortunately, earlier flat disks can be fitted. For the radical tuner, the throttle shafts can be thinned and ovalized for an extra CFM or two of flow.
Why Keep Them? So, why not just go to a Weber carburetor? For some, that’s a good solution, but many are bound to their SU carbs thanks to racing regulations. And then there are those who believe that properly set up SUs can perform just as well as Webers on the street, but with easier tuning and better manners. In fact, we’re in the middle of dyno testing SU and Weber carburetors. Look for our findings soon.
New Vs. Rebuilt
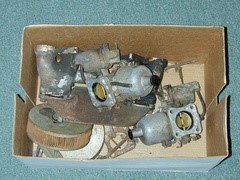
Before you buy that box of carb parts, first price what the rebuild is going to cost. In some cases, you may want to consider new carbs instead.
Burlen Fuel Systems, the company that owns the rights and tooling to SU carbs, still makes and sells brand-new replacement setups. Available for most common British classics through the big suppliers like Moss Motors and Victoria British here in the U.S., these new carbs can be an excellent option. However, the new carbs are not identical to the ones they are replacing. In most cases, many of the parts have been updated and thus are not interchangeable with the originals. As a result, if you go with these new SU carburetors, you won’t be able to use the standard replacement parts.
We’ve also seen a few easy-to-overcome quality problems with the new carbs, like choke linkages needing slight bending to work properly. How do you decide whether to go new or rebuilt? Consider your goals and budget. If you have a common setup like an MGB with HS4 carbs, then you may find the new ones not only a good option, but cheaper than a professional rebuild. For example, a pair of brand-new HS4 carbs will set you back about $550 to $575.
A concours-quality rebuild can cost about $600 to $700. (If refinishing the external parts is not needed, knock about $100 or $200 off that figure.) On the other hand, sometimes it’s more cost effective to rebuild the originals. New HIF4s run about $1000 per pair, while again it’s about $600 to $700 to rebuild them to concours condition. (Forgoing the polishing and replating work can save about $100 to $200 here, too.) If “concours correct” is your goal, then there’s really no question and you’ll need to rebuild the original ones. (Don’t forget, however, that your car will be down while the carbs are sent out for a rebuild.)
Can’t decide whether to go with new or rebuilt carbs? Let your budget, situation and goals guide you. ###Size Matters: Identifying SU Carbs SU carbs come in several styles and sizes. Fortunately, there is a system for understanding the size of the carbs. Each carb is identified by one or more letters and numbers. The first letter is an H or a V, which stands for Horizontal or Vertical. The SU carbs commonly used on European cars are all of the horizontal design. The next letter will describe the physical characteristics of the carb and usually describes the float chamber location: S stands for Side float or Short body, depending on which expert you call; IF stands for Internal Float; and D stands for Diaphragm jet.
The numbers require an understanding of fractions, as they indicate how many eighths of an inch over 1 inch the carb’s throat size measures. So, an HS4 carb is 1+(4×1/8) inches, or 1 1/2 inches. To put this together, an HIF4 (common MGB carb) is a horizontal, internal float, 1 1/2-inch carb. An HD8 (common XKE carb) is a horizontal, diaphragm type, 2-inch carb. An HS2 (common to Spridgets and Minis) is a horizontal, side float, 1 1/4-inch carb. One exception to the “fraction” rule is the more modern HIF44, common to newer Minis. It is also called a “metric” SU because the float is measured in millimeters. (In this example, the horizontal, 44mm internal float measures about 1 3/4 inches across.)
In addition to size and type, there are a few other things to consider before you start buying used carbs on eBay. Some carbs have vacuum fittings, some do not. Carbs are often configured in sets of two or three and need to be kept in order for linkages to work. HS carbs may also have different float bowl angles. For example, Spridgets are 20 degrees, while Minis are 30 degrees. If you had to pick from the various models, the HS version is probably the best one to go with, followed by the HIF models. The earlier H type carbs are pretty good but suffer from faster wear in the choke linkages and are a little more prone to leaks from the float bowls. HD carbs are more complicated, with a separate idle circuit and diaphragms inside. HS and HIF carbs aren’t perfect, either: HS models are very prone to throttle shaft wear, while HIFs don’t tend to wear at the throttle shafts, but are a bit more complicated and have more of a tendency to overflow if they get dirty.
How many carbs should you run? For most performance engines, one carb for every two cylinders works pretty well. How big? Unless your engine is pretty heavily modified, you’ll probably do best with the stock size that came with the car. If you need a little more, jump up a quarter of an inch. If you’ve got a full-race engine with an excellent breathing head, go up half an inch.
First unwrapped in 2000, the Aero 8 was a modern(ish) take on Morgan’s tried-and-tested olde-worlde formula, and, despite its age, good examples can still be found
For all that the new Plus Six does to take Morgan belatedly into the 21st century, with its all-independent suspension, lightweight aluminium chassis and punchy turbocharged straight six, it doesn’t exactly advance the Malvern brand’s design language beyond, say, 1964.
That’s part of Morgan’s charm, of course, and its steadfast commitment to traditionalism is an integral component in its quiet but sustained success. So when the cross-eyed Aero 8 was unwrapped at the 2000 Geneva motor show, all bets were off.
Here was a genuine, up-to-date sports car, with a BMW V8 giving it a competitive 4.8sec 0-62mph time and promises of engaging dynamics, courtesy of new inboard shock absorbers, double-wishbone suspension and AP Racing performance brakes.
The modernisation didn’t stop there, either: niceties including air conditioning, cruise control and a heated windscreen placed the Aero 8 in another realm entirely to the brand’s existing models. Morgan being Morgan, of course, it was all still assembled around an ash wood frame, and the asymmetrical metal dashboard would look equally at home in the cockpit of a 1960s airliner. If it ain’t broke…
Just over 200 examples of this first-generation car were produced between 2000 and 2004, and they still pop up in the classifieds periodically. Its Series 2 successor, subtly restyled to comply with US safety standards and allow for a roomier cabin, packed a hefty power upgrade but was built for only a year in limited numbers, so most have been retired to private collections.
The closest the Aero 8 came to receiving what you might call a facelift was in 2005, when the Series 3 was launched with Mini headlights in place of the previous New Beetle items, giving it a more conventionally styled visage without compromising on its retro appeal.
Mechanicals were left largely untouched until the roadster entered its final form in 2007 with 362bhp from a 4.8-litre V8 that BMW kindly continued producing on a limited basis for Morgan after retiring it from its own line-up. An automatic gearbox was also made available for the first time, featuring an optional Sport mode and offering improved straight-line performance over the six-speed manual unit.
The Morgan Aero 8 has pace and kerbside status in spades, but it’s very pricey.
Later variants include the ultra-exclusive, boat-tailed AeroMax coupé and its Targa-topped Supersports sibling, the traditionally styled Plus 8 and, more recently, the Series 5 – a revived, subtly updated version of the Aero 8, produced from 2016 to 2018. The austentacious Aero GT acted as the car’s swansong, and was made in very limited numbers.
Happily, because improvements and tweaks made to the supercar over its 18-year life cycle were so subtle, choosing which version to go for is simply a matter of deciding your budget: prices for early cars begin at £40,000 (plus shipping costs if you opt to import), but you can expect to pay above £120,000 for low-mileage Series 5 cars and special editions.
How to get one in your garage
An expert’s view
Melvyn Rutter, Melvyn Rutter Ltd: “It’s a very finite market, and not that many come up for sale, because people tend to like them and drive them. Initially, there was a huge rush and Morgan couldn’t make enough. It was only the really determined who stuck with it and waited; they weren’t impulsive buyers. Like the 3 Wheeler, there were people who had never really thought about a Morgan before, and we got new people into the fold.”
Buyer beware…
Engine: The side-exit sports exhaust is a highly prized option, giving post-2004 cars a bassy growl. Both BMW-derived V8 engines are characteristically durable, but stick to their servicing schedules and shell out for genuine parts.
Body: Series 1 and 2 cars are known to suffer leaky roofs, so keep them garaged. Wooden element of the chassis means crash repairs and restoration work is a specialist job best undertaken by a Morgan dealer. Body panels, especially the bootlid, evolved over the years, so research before replacing them. Low front splitter is prone to stone chips.
Gearbox: Don’t be put off by a noisy manual gearbox. The Aero 8 features far less soundproofing than a contemporary BMW, so a degree of crunchiness and whirring is par for the course. Installing a quick-shift gearstick helps to eliminate some of the clunkiness.
Electrics: Exposed indicator wires can come disconnected, so check under the front wings if they’re playing up, and later Beetle headlights have a tendency to let water in and become misted. Series 1 cars suffered from a sticking starter motor, especially after long periods of non-use. Fit a conditioner to keep specialist gel battery in working order. Power-steering pump is a weak spot, but replacements are easily found.
Interior: Later interiors are more modern but still prone to wear if not maintained properly. Popular modifications include an aluminum steering boss and a Mota Lite steering wheel, while an upgraded stereo is a wise investment.
Also worth knowing
The manufacturer offers a full maintenance and restoration service at its Pickersleigh Road headquarters, with a fixed price servicing structure.
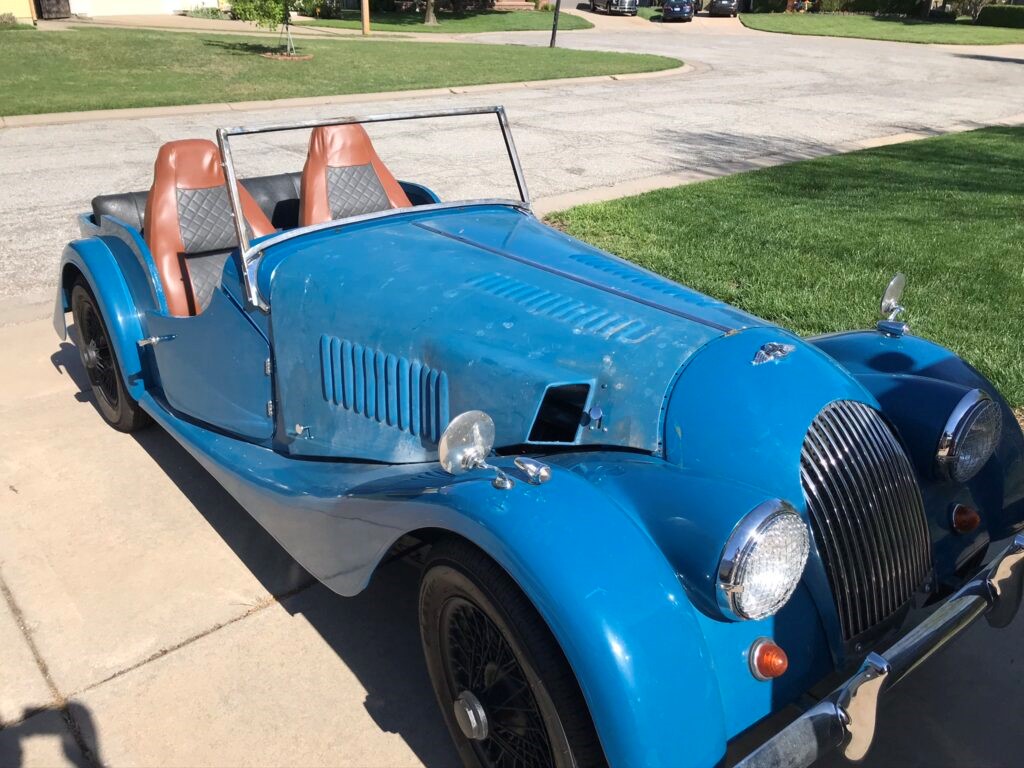
[I guess it had to happen eventually with all the hype around electric vehicles. Converting this older RHD Morgan 4/4 4 Seater may not bend too many rules but I personally hate to see any Morgan get excessively modified or scrapped. As stated in the article we will have to wait and see if this project is ultimately successful or not. Mark]
Electric cars are seen as the pinnacle of technology and modern engineering; however the Retro-Electric brigade seem to choose vehicles that are about as far removed from modern machines as possible. We have covered early Land Rovers, VW Beetles, Type 2 campers and Morris Minors. None of which could ever have been said to have been cutting edge, even when they were new.
There is something about these cars though, they have a character through their basic roots that others just do not have. However, Morgan takes traditional build to a different level, after all this car is still built from the same material that they make horse carts from!
The Morgan 4/4 has been in production since 1936, in a largely unchanged style. In fact, it was Morgan’s first car with four wheels, the name indicating that the model has four wheels and four cylinders.
Apart from a break during World War Two, the 4/4 has been in continuous production from its debut right up to the present day. The original engine was a 1.1l Coventry climax, increasing in size to the modern 1.8 ford engine currently used, however despite recent headlines about a future vehicle, never has electricity powered a Morgan.
Greg Mittman from Kansas City in Missouri is about to change that.
You would be right to expect a Morgan Retro-EV conversion to take place in the UK, after all it’s the home of the very British marque, however during the 1950’s and 1960’s the US accounted for over 85% of all production and they remained a very popular, if specialist, car in the states.
The Morgan was no stranger to a conversion in the USA either, in 1974 emission regulations threatened to kill off the car, so the company converted all imports to run of propane to pass the US emission regulations, therefore electrifying a Morgan is putting a modern twist to an old story.
Initially Greg had no plans for a Retro-EV, he wanted to restore a vehicle with his father, Sam, who is an experienced home mechanic. With no specific model in mind they started looking through online auctions for something interesting nearby.
Greg came across the ad for the 1969 Morgan 4/4, but was completely unfamiliar with the brand, however he did a little digging and the British charm and unique design convinced him that this was the car to restore.
Sam was convinced, an experienced hobby mechanic, the basic structure and mechanics meant the Morgan should have been a simple restoration.
However, when they got the car home it became obvious that they had taken on more than expected. The engine in the car was not original and missing many parts which would have been exceedingly difficult to source in the US.
Half joking Sam suggested, “We could make it electric” and what initially seemed unlikely has become a two-year labor of love.
The car has been converted by the pair at weekends and during downtime and is now starting to near completion, despite this being the first experience of E-power for either of them.
Taking advice from enthusiasts and experts has helped them specify the right parts for the conversion.
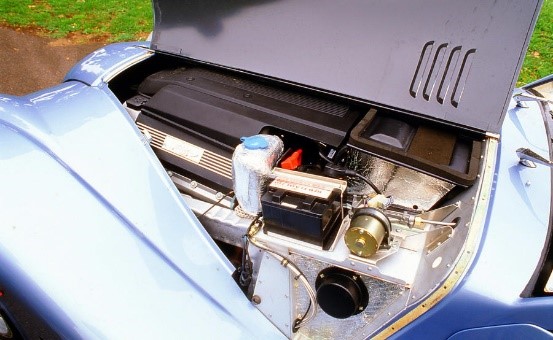
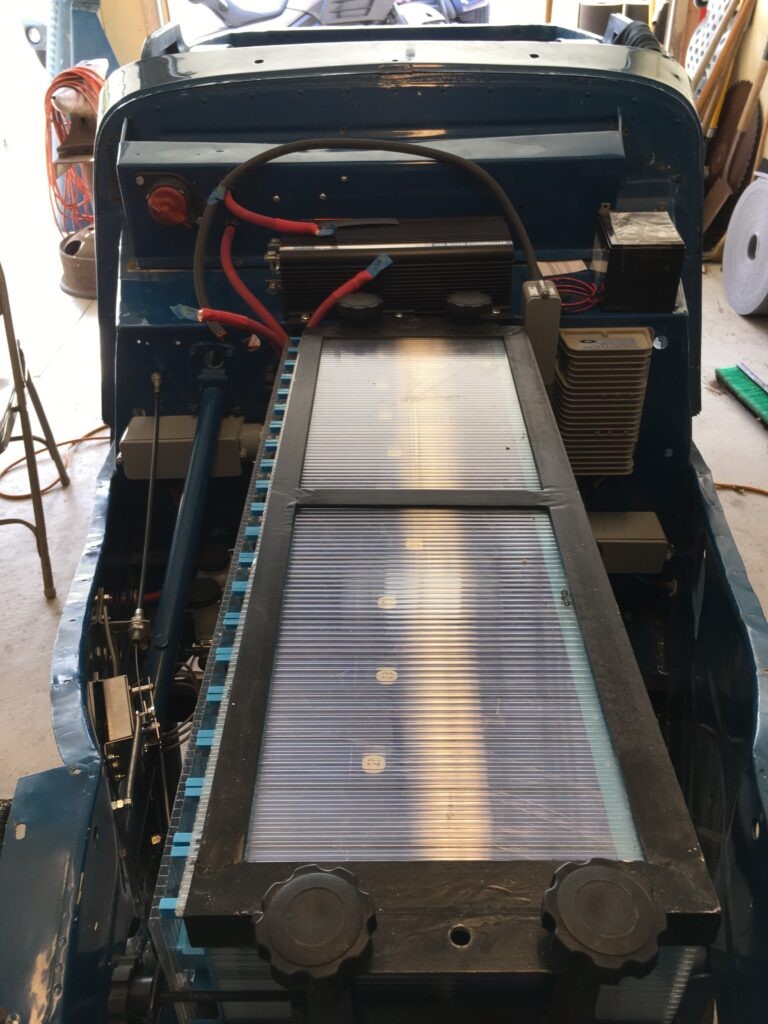
Greg has chosen a Netgain Warp 9 DC customer motor coupled to the cars original ford gearbox for its powertrain. The Warp 9 is one of the most popular motors used for conversions in the US, its size and performance combination make it a popular choice, delivering 32hp and 70ib ft of torque. The Warp 9 is also a cost-effective solution at around $2000.
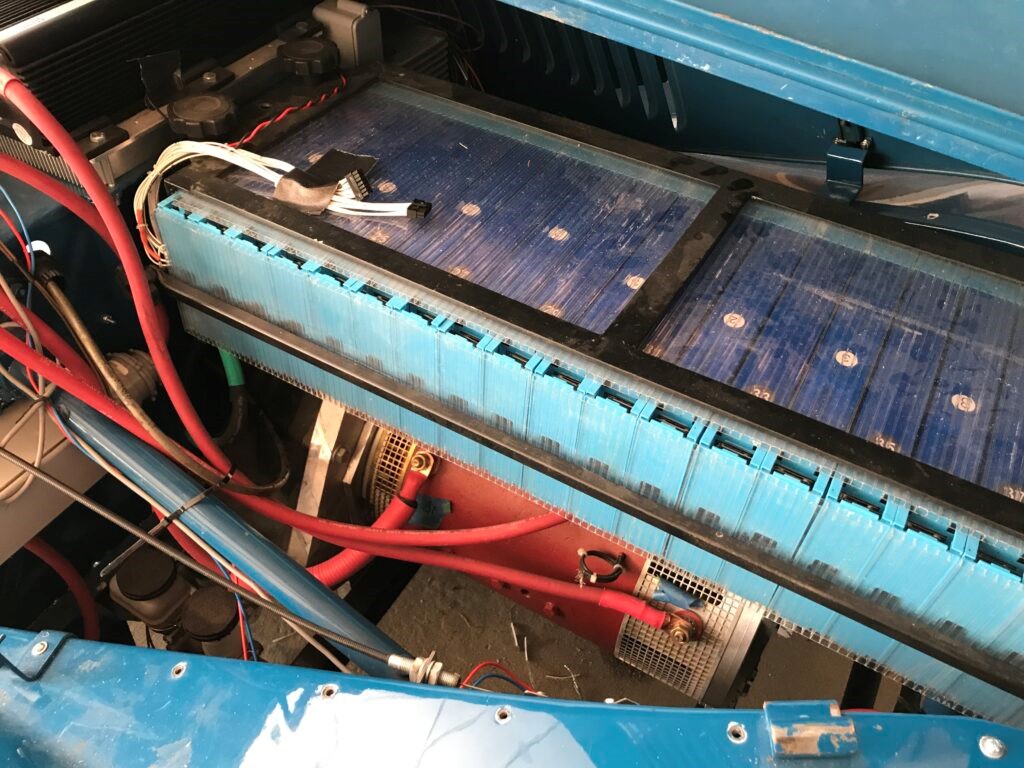
The project will use 40 LiFePO4 3.2v 100ah batteries. As with the motor, they are one of the most popular choices. The Morgan offers plenty of room for fitment of the batteries behind the seats and at the rear, with additional room up front to help balance the load.
A Curtis 1231c controller has been purchased and will be fitted to keep everything performing correctly.
One of the key elements in any build is the charger, many projects can be ruined with the choice of a poorly specified charger. Make sure that you consider your requirements carefully when choosing your charger. Greg chose a TSM2500 unit. This unit has user adjustable settings and has been setup for 110V US power. The units also offer great output in a relatively small size, very useful for Retro conversions.
Greg is still testing the car but is comfortable that upwards of 50 miles to a charge is comfortably achievable with the specification he has chosen, it’s also likely to comfortably outperform the original powertrain.
The Dilithum BMS installation is nearing completion and then the pair will move on to the final part of the build, the body.
The handmade windscreen is out for chrome and It still needs body, interior and instrumentation work, but Greg is convinced that this is the easy part and can’t wait to get the car on the road.
The “e-Mog” has some way to go to completion, however the unusual right-hand drive car has already generated a lot of attention in Kansas where the electric conversion will be totally unique in gas loving middle America.
Keep an eye on our site as we continue to cover Gregs conversion.
The relaunched classic boasts old-school beauty – and breathtaking speed
When jovial business guru the late John Harvey-Jones visited the Morgan Motor Company in 1990 for the BBC’s Troubleshooter show, he declared the firm “almost automatically doomed” due to its outmoded manufacturing and inability to edge production beyond a quaint nine-and-a-half vehicles per week. The waiting list, often 10 years long, that sometimes resulted in would-be owners being laid to rest long before their cars emerged from the factory really would have to be addressed…
Thirty years later, production has soared to a heady 15-plus cars per week (for contrast, Toyota builds more than 13,000 per day on average) and Harvey-Jones’s recommendation to modernise has finally manifested in the most radical leap forward: a redesign of the resolutely retro Plus Four. It’s a key model in the marque’s offering that has remained largely untouched since its introduction in, er, 1950.
Arriving at the ramshackle brick buildings in Pickersleigh Road, Malvern Link, Worcestershire – Morgan’s home since 1914 – I am pleased to see that things still look much the same as ever. The timber store is well stocked with blocks of ash for making the wooden framework to which bodywork and vintage-style running boards are attached; part-finished cars are still being pushed by hand from one build process to another; and there isn’t a robot in sight.
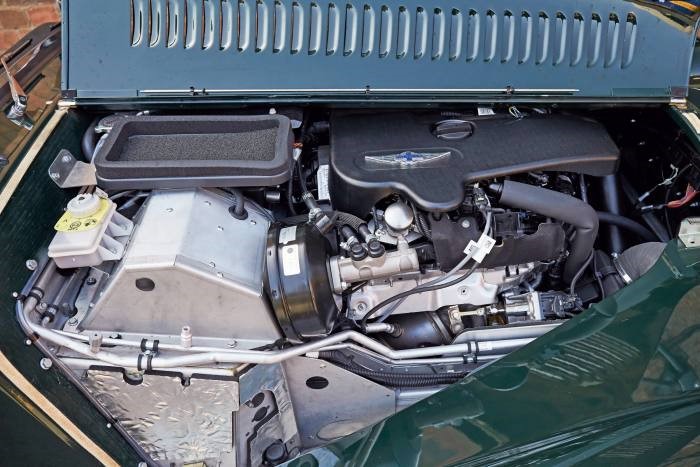
But when it comes to the finished product, Morgan has modernised – and then some. Instead of the steel chassis that formed the basis of the original Plus Four, the new car sports a “CX-Generation” platform made from bonded aluminium, at the front of which sits a two-litre BMW TwinPower Turbo engine tuned to produce a useful 255hp.
The combination of new underpinnings and lightweight aluminium panels set around the signature ash frame make for a weight of a gossamer 1,009kg in the automatic model, giving the car a power-to-weight ratio of 253hp per ton – which makes for true 21st-century sports-car performance (0-62mph in 4.8s and a top speed of 149mph).
Until recently, the Morgan line-up comprised several four-wheel models with similar looks, plus the more aggressively styled Aero Eight and the quirky Three Wheeler that harks back to the brand’s origins as a maker of lightweight “cyclecars”. Now the range has been distilled to comprise the Three Wheeler, Plus Four and Plus Six (an ultra high-performance model also on the CX-Generation platform but with a six-cylinder BMW engine), with the Plus Four set to become the most popular model.
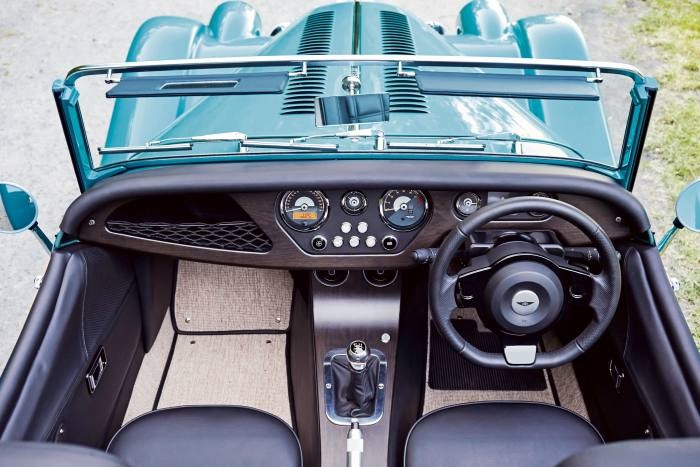
Outside and in, it looks similar to the old car, with the same slightly fiddly manually folding roof, low-cut doors and a cockpit that, while easier to get into, still demands a fair deal of flexibility. Once ingress is achieved, there’s miles of legroom and a comfortingly low-tech dashboard with just the basics: speedo, rev counter, start button and one knob each to control a blower and heater (nothing too precise – just cold, warm or warmer). The flat windscreen is just the same too – so long and narrow that it requires three short wipers to cover its area. The sound system, however, has had an upgrade, with Bluetooth connectivity and some quality speakers for music streaming.
But it’s only in driving the Plus Four that the difference from its predecessor becomes readily apparent. The rigidity of the aluminium platform completely eliminates all of the old model’s shakes and rattles and, combined with up-to-date suspension and braking systems, it’s far smoother, sharper and more relaxing at both low and higher speeds. When the occasion demands, it really is blisteringly, cartoonishly quick…
And with the waiting list now down to six months, you can even have one delivered in the same lifetime.
While Harvey-Jones might not be too pleased that annual production numbers are only just hovering around the figures he was hoping to see 30 years ago, he would not be sad that Morgan has moved away from its original remit of 1909 to produce cars for everyday motoring (its first model was called the Runabout): the car I drove, with extras including special paint, box weave carpet, sports exhaust and luggage rack (an essential) carried a price tag of £74,949.
And with the waiting list now down to six months, you can even have one delivered in the same lifetime.
Aside from filling the gas tank, changing a Morgan’s engine oil is perhaps the most common task required to keep the car running properly. This bit of routine maintenance can be done by a ‘quick lube’ shop on your break, at the Morgan dealership (if you have one!) or more commonly, in your own garage or driveway. New, clean oil is an engine’s best friend, but too much of it can cause costly damage, reduce engine performance and should be removed as soon as possible.
If Some Oil is Good, More Oil Must be Better? Right?
To understand how overfilling your engine oil is too much of a good thing, it’s helpful to first provide a little background.
Engines are comprised of hundreds of precision-crafted parts working in unison at high speeds and temperatures, all of which require oil for proper lubrication and smooth movement. You add oil to an engine to the crankcase, as directed by your Morgan’s Owner Handbook, using the oil filler port under the bonnet. The oil settles in the oil pan when the engine is not running. When you start the Morgan, the oil circulates throughout the engine, to lubricate all the moving parts (like the spinning crankshaft), and passes through an oil filter that removes contaminants that could potentially cause damage.
When too much oil is added, the level in the oil pan becomes too high. That allows the spinning crankshaft to come into contact with the oil and essentially aerate it. The result is a foamy, frothy substance that cannot adequately lubricate the engine.
Also, the extra oil may create excessive pressure inside your engine that will look for an escape through various gaskets and seals. If one or more of those fail, that will lead to leaks and who wants a leaky Morgan?
One area that is sometimes omitted when discussing excessive oil is the a drop in engine performance. This drop in performance comes from a few places. The foamy, frothy substance that circulates with the crankshaft weighs something and this added weight makes it harder for the engine to spin. The spinning is what makes the power and adding any load here causes a performance hit. Also, the inconsistency of the oil pressure, caused by the foamy, frothy oil cloud, will most likely result in another performance hit.
Checking to See if Your Morgan Has Too Much Oil
If you think you have excess oil in your Morgan’s engine, the quickest way to know is to look at the dipstick. “Too much oil,” however, is not a precise measurement. Every engine design has different dimensions, so knowing at what level your engine oil will become a foamy, frothy oil cloud is almost impossible.
The dipstick is a graduated rod that slides into a tube that goes into the engine’s oil sump. It typically has low and high marks to show if your car has too much, too little, or the perfect amount of oil. Anywhere in that range is perfectly fine, as is maybe a modest amount above the top level, but I would certainly get nervous going much above that. It’s advisable to get into the habit of checking the level frequently, and certainly after an oil change.
Your owner’s manual can tell what to look for when checking your car’s oil, but the owner’s manual is really only valid if the engine is bone stock. If you have modified the engine’s sump or the engine itself, the manual might be incorrect.
[Note: I once bought a Morgan that didn’t have a dipstick! I went to check the oil and was gobsmacked! (Is that even a word?) So, I know there are universal ones available, and cheap too! Mark]
There are other indicators that will suggest you have an overfill problem, including blue exhaust smoke, a burning smell, an oil leak, or an excessively high or low reading on your oil pressure gauge (some Morgans have gauges, some do not).
What do I do to Get Rid of the Excess?
If you have significantly more oil than the top of the dipstick range, play it safe and let some out. There’s nothing high-tech about the procedure: Loosen the drain plug like you do for an oil change and let out a cup or two at a time. Then snug the drain plug, start and idle your engine for a minute, shut it down, and then recheck the dipstick, wiping it once and then putting it back in for a correct reading. And, do all of this while parked on a level surface. (Make sure you dispose of the used oil properly and don’t just dump it down the drain!)
Also, remember that if you’ve been driving the car before the oil change, the oil is likely hot and could cause burns if you don’t handle it appropriately. If you’d prefer having a ‘quick lube’ do the job, go for it, but be inquisitive and don’t just assume they know what they are doing. Make sure they do it correctly and check their work afterwards. They may know Toyotas but will not be familiar with Morgans.